
#HTE
5 Features in KeyShot 6 That Change the Speed of Visualization
Title image by John Seymour.
Whether you’ve had a love of 3D rendering that spans decades or are new to creating product visuals, there’s a sense of satisfaction and excitement that comes from creating photographic quality renderings and animations of 3D geometry. Maybe it’s the challenge or maybe it’s how one tool in particular makes getting results extremely fast. Luxion’s KeyShot 6 is the tool of choice when it comes to product visualization and has the ability to generate that excitement and some very impressive results for those who use it to create their concept, design, engineering or marketing visuals.
A lot of people say they love KeyShot—we have over the years. There’s likely a story in itself about why people would love a software program so much. Once we go over some of the features in the new version of KeyShot 6, you may understand that better. Each version has seen a lot of new features. Maybe too many to keep up with at times. People tend to use a software the same way after they get a process down. But software grows, KeyShot certainly has, so we’re going to point out some of the new features in KeyShot 6 that you definitely need to add to your toolset along with some existing features you may not have known about.
Before we dive in, it’s important to mention a couple of very important differences with KeyShot. At its core, KeyShot is real-time, CPU-based rendering. It’s built around this. And since it’s not a mode that you go in and out of, all the material changes, lighting, camera, animation and rendering all happens in real-time—you see what your final rendering is going to look like as you create it. Keep that in mind as we go through these features, as real-time viewing applies to them as well. KeyShot also has free plugins for a multitude of CAD and 3D software and support for more 3D formats than we ever knew existed. Here we go.
Interior Lighting
Each major version of KeyShot has had improvements to the interface to help speed along the rendering process. This is demonstrated best in KeyShot 6 with the addition of a new Lighting tab in the Project window that contains pre-configured lighting presets. Whereas before you set up your lighting for each scene, you now have six new lighting modes and the ability to create custom lighting modes that can be reused on other scenes. The lighting mode you want to pay attention to is ‘Interior’ mode. The KeyShot lighting algorithm was optimized around this for speed with complex interior scenes, and while it does that, it also makes a big difference with lighting product shots as well.
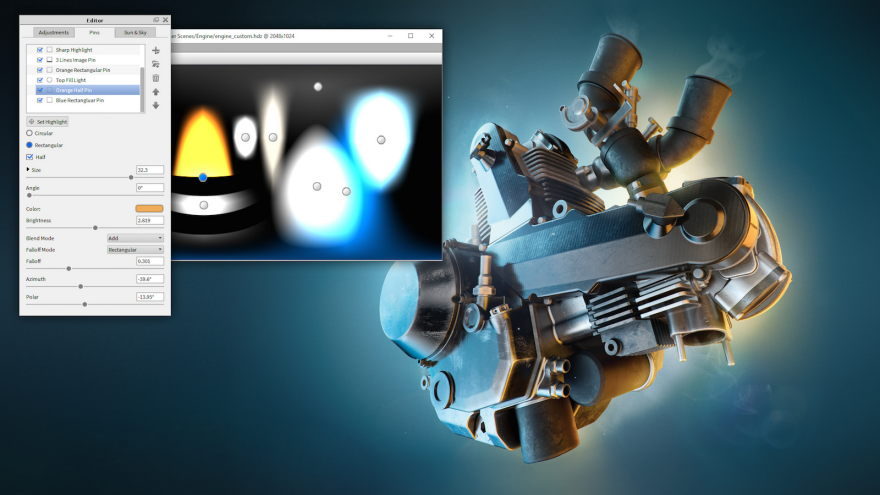 HDRI Editor
Now, if you are set on using only the HDRI lighting presets in KeyShot, the HDRI Editor in KeyShot Pro is an absolute must have. This takes you from searching for just the right HDRI environment to adding and editing lights or using the built-in Sun & Sky system. With the HDRI Editor open, you can select points on your model where you want to add highlights, adjust them, add blur, rotation, or color. The HDRI lighting can be used as your main light source or supplemented by dropping in a sphere or plane and setting it as a physical spot, area or IES light profile. And the lighting modes can be used right along with the HDRI environment you choose or physical lights you add. This interior by Sonos (below) is not only an example of how KeyShot handles interior spaces, but shows how product design shots can benefit from KeyShot’s lighting as well. (Read how Sonos uses KeyShot here.)

Material Graph
If you look through the KeyShot 'Amazing Shots’ forum and what has been created with KeyShot 6 on their dedicated Pinterest board, it’s obvious there are a lot of changes in KeyShot 6. The beta testers and users jumped on this next feature with such fervor, it deserves to be among our major highlights. Magnus Skogsford said, “The material graph has really taken the software leaps ahead of its predecessors.” And Designer, Eric Brock said, “I love the how the Material Graph allows such spontaneous creativity with immediate visual feedback.”
You all know KeyShot has hundreds of material presets. What you may not know is that these materials are based on material types. You can edit any material you dragged onto your part (double-click any part) and see what material type it’s made from. The material type is the foundation, on top of this you can add textures (image or procedural) and labels. With KeyShot 6, you get the Material Graph. This is an advanced material editor accessed from the Project window’s Material tab.
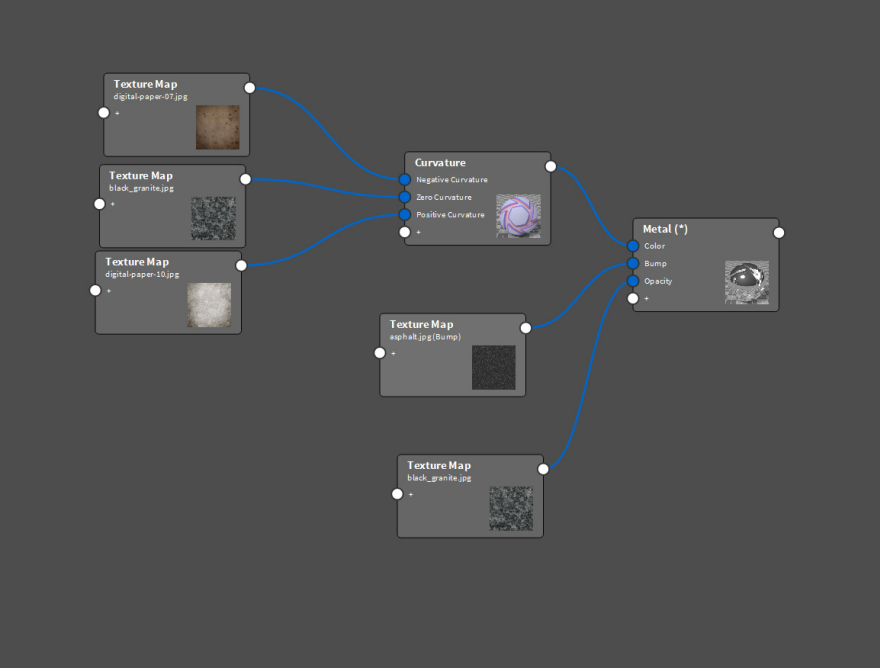 Material Graph in Keyshot 6 helps visualize connections between material types and textures.
Now, the Material Graph opens in a separate window and displays materials, textures, labels and more as nodes (boxes with connectors) to visualize connections and relationships between material types and textures. While it might look complex, it’s quite intuitive. To see how it works, open it and change some materials, add textures and apply labels as you normally would. You’ll see it update and see how the connections work. With the Material Graph, the combinations of materials are unlimited. You can layer materials, modify their settings and even animate materials. Above is just one example by organic jewelry designer, Nacho Riesco, to illustrate how he set up the Material Graph and the type of affects you can achieve.
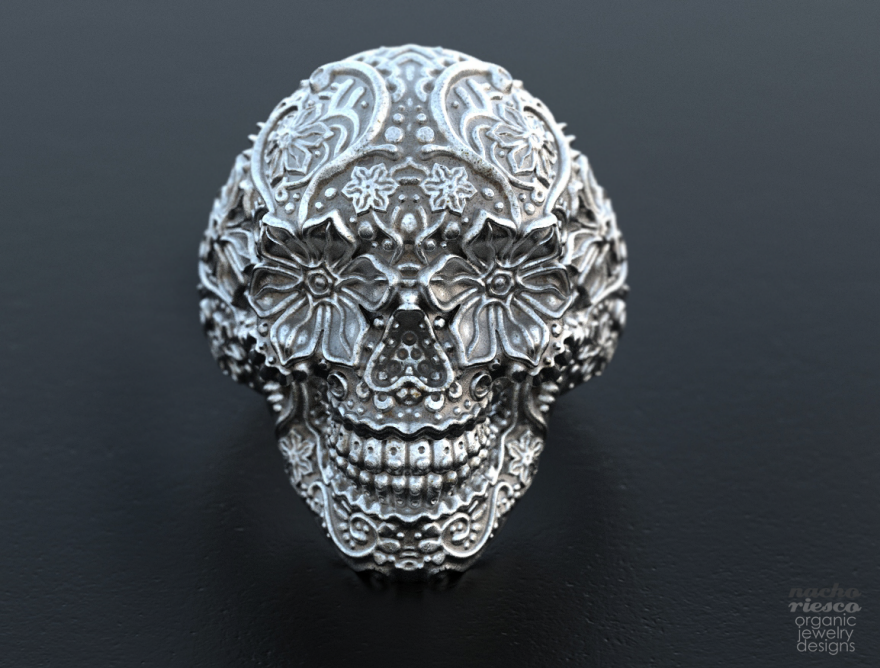 Sugar Skull by Nacho Riesco.
Materials on Labels
With the flexibility that the Material Graph brings to KeyShot Pro, it makes sense that new material capabilities would be seen for all version of the software as well. The ability to add materials on labels doesn’t require the Material Graph, but is an incredibly powerful addition to KeyShot. Labels in KeyShot are really a way to layer texture maps and thier materials, with the labels acting as sort of a blended material. Whereas before, a label would look smooth when applied to a material with a rough texture, it can now take on the same rough properties of that material or even have a completely independent material applied to it. There’s a really great example of this, with Martin Kamminga’s Glenlivet Whiskey Bottle rendering.

You can see the complete Material Graph breakdown and how he set up the labels here. As he describes it, he divided the elements of the label into different layers, so he could assign a different label material to each. The result is amazing.
Material Animation
From Materials on Labels we want to jump quickly into Material Animation, another feature in KeyShot Pro. Perhaps you have created visuals in the past that faded between different color configurations, had some parts fade out or displays different levels of texture possibilities. These are the types of renderings this tool is for, cutting out the huge amount of post work necessary to create visuals like that. There are two types of Material Animations that capture the options you would need, Color Fade and Number Fade. Color Fade controls material colors, while Number Fade controls material settings. Think of Color Fade as a transition between colors and Number Fade as a transition between settings you can control with numbers, like light power, roughness or scale. While these effects are put together using the KeyShot Animation Timeline and the Material Graph, you still see everything happen in real-time, whether it’s adjusting the settings in the Material Graph Node or scrubbing the timeline of the Material Animation you just set up. I think the best way to demonstrate this is with a recent Quick Tip Luxion published, that explains all this feature does in about four minutes.
Geometry Editor
Now, we’re sure you’ve opened a model to render, only to find the surfaces a split up or a chamfered edge or a face that needs to be a different material that the rest of the part. Before KeyShot 6 you would need to rework the model in the 3D modeling software, but with KeyShot 6 Pro, the new Geometry Editor lets you do that inside KeyShot. It happens through the new Geometry View—a secondary OpenGL viewport. This dockable viewport, which can be synced with the real-time viewport, does a bit more than provide a simple shaded view mode (and has a lot of space on the toolbar, perhaps for future functionality). This viewport is where you select the button to Edit Geometry. Here, you can select the faces you would like to split or merge. Once finished, materials can be applied as needed, without having to go back into the modeling software to modify the geometry. Though this is the first iteration of this tool, it already combines the ability to split surfaces, split objects, close meshes, edit normals, and view and edit camera paths—features that make it the best option for a streamlined rendering process. This example from designer Will Gibbons shows how he split out faces for a project he was working on.

There’s a lot more to KeyShot 6—multi-layer PSD, Shift Lens, Scripting and responsive KeyShotVR (see below). We just touched on five features that demonstrate the ease and the power at the core of the real-time rendering software. We recommend looking over the What’s New page and grabbing the guide to see everything included and how it works. One last important change to note is that KeyShot HD now includes unlimited real-time and output resolution, and KeyShot Pro now includes KeyShot Animation, both at no extra cost.
There’s certainly something to be said for software that is useful enough to stand aside and let you work on the design, not on wrestling the interface or guessing at settings only to have to wait to see the results. The idea that a designer can dream up virtually anything and within hours have a 3D model and a photorealistic rendering is nothing short of mind boggling. Luxion has crafted awe-inspiring rendering capability with a user experience that makes the software disappear from the thought process altogether. It is, without question, a must have in the product development workflow.
http://www.core77.com/posts/52062/5-Features-in-KeyShot-6-That-Change-the-Speed-of-Visualization